Hold down the T key for 3 seconds to activate the audio accessibility mode, at which point you can click the K key to pause and resume audio. Useful for the Check Your Understanding and See Answers.
 Light always follows the law of reflection, whether the reflection occurs off a curved surface or off a flat surface. The task of determining the direction in which an incident light ray would reflect involves determining the normal to the surface at the point of incidence. For a concave mirror, the normal at the point of incidence on the mirror surface is a line that extends through the center of curvature. Once the normal is drawn the angle of incidence can be measured and the reflected ray can be drawn with the same angle. This process is illustrated with two separate incident rays in the diagram at the right.
Lesson 2 discussed the formation of images by plane mirrors. In Lesson 2, it was emphasized the image location is the location where reflected light appears to diverge from. For plane mirrors, virtual images are formed. Light does not actually pass through the virtual image location; it only appears to an observer as though the light is emanating from the virtual image location. In this lesson we will begin to see that concave mirrors are capable of producing real images (as well as virtual images). When a real image is formed, it still appears to an observer as though light is diverging from the real image location. Only in the case of a real image, light is actually passing through the image location.
What is an Image? How is it Formed?
Suppose that a light bulb is placed in front of a concave mirror at a location somewhere behind the center of curvature (C). The light bulb will emit light in a variety of directions, some of which will strike the mirror. Each individual ray of light that strikes the mirror will reflect according to the law of reflection. Upon reflecting, the light will converge at a point. At the point where the light from the object converges, a replica, likeness or reproduction of the actual object is created. This replica is known as the image. Once the reflected light rays reach the image location, they begin to diverge. The point where all the reflected light rays converge is known as the image point. Not only is it the point where light rays converge, it is also the point where reflected light rays appear to an observer to be diverging from. Regardless of the observer's location, the observer will see a ray of light passing through the real image location. To view the image, the observer must line her sight up with the image location in order to see the image via the reflected light ray. The diagram below depicts several rays from the object reflecting from the mirror and converging at the image location. The reflected light rays then begin to diverge, with each one being capable of assisting an individual in viewing the image of the object.

If the light bulb is located at a different location, the same principles apply. The image location is the location where reflected light appears to diverge from. By determining the path that light from the bulb takes after reflecting from the mirror, the image location can be identified. The diagram below depicts this concept.
You might notice that while the same principle applies for determining the image location, a different result is obtained. When the object is located beyond the center of curvature (C), the image is located between the center of curvature (C) and the focal point (F). On the other hand, when the object is located between the center of curvature (C) and the focal point (F), the image is located beyond the center of curvature (C). Unlike plane mirrors, the object distance is not necessarily equal to the image distance. The actual relationship between object distance and image distance is dependent upon the location of the object. These ideas will be discussed in more detail later in this lesson.
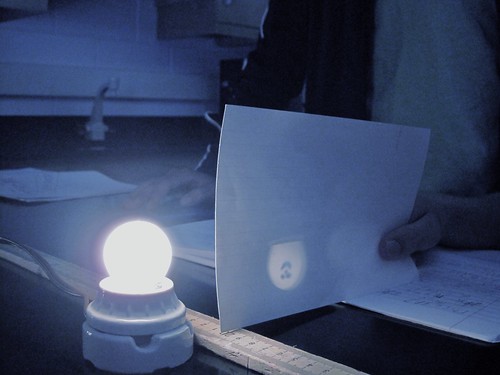
Flickr Physics Photo
A smiley face is inscribed onto a night light bulb; it's appearance is flushed out by the light of the bulb. The bulb is screwed into a light socket and placed in front of a concave mirror (not shown). The image is projected onto a note card; the image is inverted.
We Would Like to Suggest ...

Why just read about it and when you could be interacting with it? Interact - that's exactly what you do when you use one of The Physics Classroom's Interactives. We would like to suggest that you combine the reading of this page with the use of our
Optics Bench Interactive or our
Name That Image Interactive. You can find this in the Physics Interactives section of our website. The
Optics Bench Interactive provides the learner an interactive enivronment for exploring the formation of images by lenses and mirrors. The
Name That Image Interactive provides learners with an intensive mental workout in recognizing the image characteristics for any given object location in front of a curved mirror.